BTC - Bitcoin
 USDTERC20 - USDT ERC20
 ETH - Ethereum
 BNB - Binance
 BCH - Bitcoin Cash
 DOGE - Dogecoin
 TRX - TRON
 USDTTRC20 - USD TRC20
 LTC - LiteCoin
How to Integrate an API in the Front-end Development
Modern web applications are fundamentally driven by data. Whether you're building a SaaS dashboard, an e-commerce platform, or a mobile-responsive web app, your front-end relies on APIs to function dynamically. Static interfaces are no longer enough. Users expect real-time updates, personalized content, and seamless interactions.
That’s where API integration in front-end development becomes critical.
This guide goes beyond theory. You’ll learn how APIs actually integrate into front-end workflows, how to implement them using JavaScript and React, and handle real-world challenges like errors, authentication, and performance optimization.
What Does API Integration Mean in Front-end?
API integration in front-end development refers to connecting the user interface (UI) with a back-end system through HTTP requests.
Instead of embedding static content, the front-end does:
-
Requests data from an API
-
Receives structured data (usually JSON)
-
Dynamically renders it in the UI
Here is the real-world example. When you open a dashboard, the mechanism works as follows:
-
The front-end calls /api/users
-
The server returns user data
-
The UI updates instantly with live data
This creates a dynamic, responsive user experience.
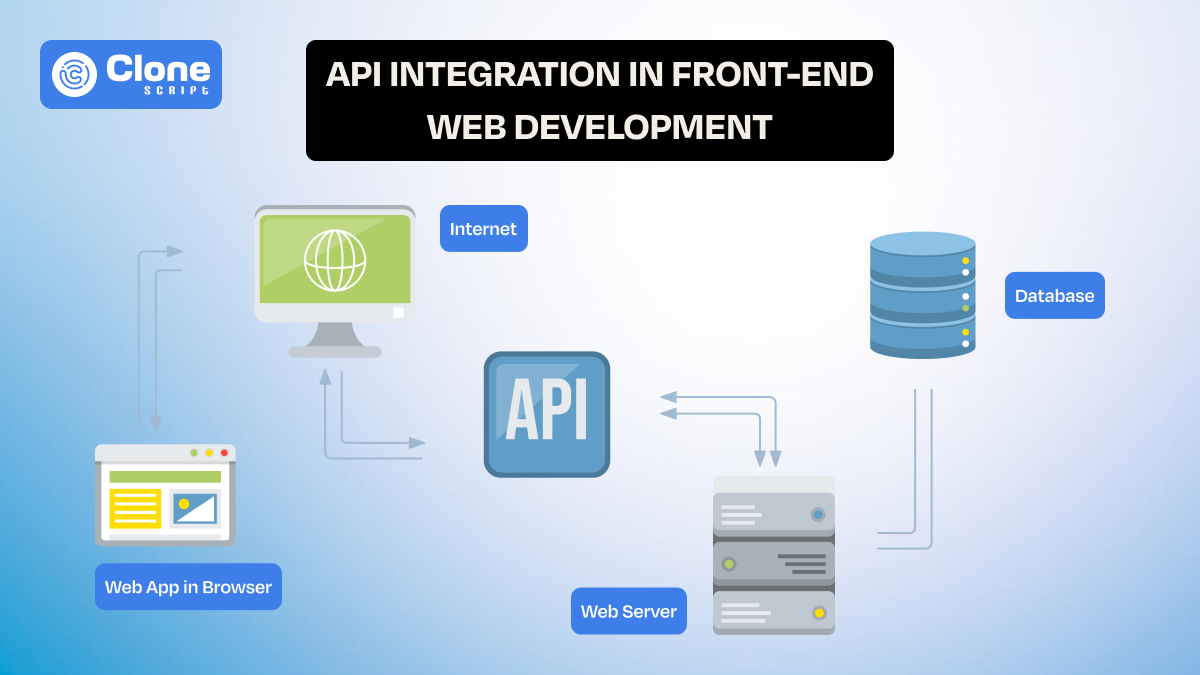
How Front-end Communicates with APIs (Explained with Example)
Front-end applications communicate with APIs through a structured request-response mechanism that enables dynamic data rendering. The process starts with an API endpoint, which is the URL where requests are sent, such as https://api.example.com/users.
Depending on the action, developers use different HTTP methods:
-
GET to retrieve data
-
POST to create new records
-
PUT or PATCH to update existing data
-
DELETE to remove data
To provide additional information, headers are included in the request. These define the data format and authentication details, such as:

In the request-response cycle, the front-end sends a request to the server. The server processes it, fetching data from a database or performing logic, and returns a response, typically in JSON format.
The front-end then parses this data and updates the UI. For example, a user dashboard can dynamically display a list of users without reloading the page, creating a seamless and interactive experience.
Methods to Integrate API in Front-end
Front-end developers primarily rely on two approaches for API integration: the native Fetch API and libraries like Axios. Both enable HTTP communication, but differ in flexibility, control, and scalability.
-
Using Fetch API (Native JavaScript)
Fetch is built into modern browsers and works with promises and async/await. It’s ideal for simple use cases where minimal setup is required.

Key capabilities:
-
Supports all HTTP methods
-
Requires manual JSON parsing (response.json())
-
Needs explicit error handling (response.ok)
-
Supports request cancellation via AbortController
-
Using Axios (Library-Based Approach)
Axios is a promise-based HTTP client designed for a better developer experience and scalability.

Advanced features:
-
Automatic JSON transformation
-
Centralized configuration (baseURL, headers)
-
Request or response interceptors (for auth, logging)
-
Built-in timeout and cancellation support
-
Cleaner error object structure
Fetch vs Axios (Quick Comparison)
| Feature | Fetch API | Axios |
|---|---|---|
| Built-in | Yes | No |
| JSON Handling | Manual | Automatic |
| Error Handling | Manual | Structured |
| Interceptors | No | Yes |
| Request Cancellation | AbortController | Built-in support |
When to Use What?
-
Use Fetch when:
-
You want zero dependencies.
-
The app is small or performance-sensitive.
-
Use Axios when:
-
You need a scalable architecture.
-
Handling authentication globally.
-
Managing complex API workflows.
Important Implementation Insight
Regardless of the method, always:
-
Validate responses before using data.
-
Handle loading and error states.
-
Avoid placing API logic directly inside UI components (especially in React).
This ensures your API integration remains robust, maintainable, and production-ready.
Step-by-Step API Integration (Real Implementation Workflow)
Understanding theory is not enough. Front-end API integration becomes clear when you follow a real execution flow from request to UI rendering. It’s important to know how data moves through your application and how each layer should be handled.
Scenario: Fetch and Display Users
We’ll simulate a common use case: fetching user data and rendering it in the UI.
Step 1: Define the API Endpoint
Choose a data source as mentioned below:

This returns a list of users in JSON format.
Step 2: Make the API Request
Use Fetch to request data:

Step 3: Handle Loading and Errors
Always manage request states explicitly as mentioned:

Step 4: Render Data in UI
Convert the API response into visible content as mentioned:

Step 5: Execute the Flow
Once everything is done, run this command to see what can happen:

React-Based Workflow (Production Pattern)
In modern applications, React is used for front-end development with structured state management. See the example below.

Key Takeaways from This Workflow
-
Separate concerns: API call, state handling, and UI rendering should be distinct.
-
Always validate responses before rendering.
-
Handle all states as loading, success, and error.
-
Avoid direct DOM manipulation in scalable apps (use frameworks like React)
Handling Secure API Responses in the User Interface
Once data is fetched from an API, the real challenge is how you represent that data in the user interface. Poor handling leads to broken UX, even if the API works perfectly. A well-structured front-end must manage multiple UI states to ensure consistency and clarity.
1. Loading State
When an API request is in progress, users need immediate feedback. Why it matters:
-
It prevents confusion.
-
It improves perceived performance.
Implementation example (React):

For better UX, use:
-
Skeleton loaders
-
Progress indicators
2. Success State
This is the ideal scenario where data is successfully fetched and rendered. Best practices to follow:
-
It formats data clearly.
-
It avoids dumping raw JSON.
-
Use proper UI structure (cards, lists, tables).

3. Error State
APIs can fail due to network issues, server errors, or invalid requests. Your UI must handle this gracefully. Avoid the following:
-
Showing raw error messages.
-
Leaving blank screens.
Instead, follow this code:

An advanced tip is to include retry buttons or fallback actions.
4. Empty State
Sometimes the API returns no data (e.g., empty search results). Why it’s important:
-
It prevents confusion.
-
It guides user action.

Key UI Strategy
A proper front-end should always account for:
-
Loading → Success → Error → Empty
Ignoring any of these states results in an incomplete user experience and potential usability issues.
API integration is not complete when data is fetched. It is complete only when it does:
-
Data is accurately interpreted.
-
UI is responsive to all states.
-
Users are clearly informed at every step.
This is what separates a functional front-end from a production-ready application.
Common API Integration Errors (How to Fix Them)
API integration issues are common in front-end development, but most are affected by predictable mistakes. Understanding these errors helps you debug faster and build more reliable applications.
-
CORS Errors:
These occur when the browser blocks requests from a different origin. This is not a front-end bug but a server restriction. The fix is to enable CORS on the back-end development or use a proxy.
-
Incorrect Endpoint or HTTP Method:
Using the wrong API URL or method (GET, POST, etc.) leads to 404 or 405 errors. Always validate endpoints against API documentation before implementation.
-
Authentication Failures (401/403):
These errors happen when tokens are missing, invalid, or expired. Ensure you pass the correct authorization headers:

-
Network Errors:
If the API is unreachable, the request fails. Handle this with fallback UI and retry logic.
-
Unexpected Data Structure:
APIs may return data in formats different from expectations. Always validate responses before rendering and executing on the live web.
-
Unhandled Errors:
Missing try-catch blocks can cause silent failures. Try to resolve it when found and make sure not to get involved in the code.
A systematic debugging approach using browser DevTools allows your API integration to remain stable and production-ready.
Authentication in Front-end API Integration
Authentication is essential in API integration to ensure that only authorized users can access or modify data. In front-end development, this typically involves sending credentials or tokens along with API requests.
-
API Keys
One common method is using API keys, where a unique key is included in the request header. This approach is simple but less secure and mainly used for public APIs. Here is the example.

-
Bearer Token Authentication (JWT)
A more secure approach is Bearer token authentication (JWT). After a user logs in, the server provides a token that must be included in each request.

Token storage is important. While localStorage and sessionStorage are easy to use, they are vulnerable to attacks. HTTP-only cookies are considered more secure for production environments.
Best Practices:
-
Never expose sensitive keys in front-end code.
-
Use environment variables for configuration.
-
Implement token expiration and refresh mechanisms.
-
Always use HTTPS for secure communication.
Proper authentication ensures secure data exchange, user protection, and application reliability in real-world front-end systems.
Performance Optimization Techniques for API Integration
API calls directly impact front-end performance. Poor implementation can lead to slow loading times, excessive requests, and a degraded user experience. Optimizing how and when APIs are called is essential for building scalable applications.
1. Debouncing API Requests
Debouncing limits the number of API calls triggered in quick succession, especially useful in search inputs.

This prevents unnecessary requests and reduces server load.
2. Caching API Responses
Avoid making repeated requests for the same data. Cache responses using tools like React Query or SWR, or implement manual caching strategies. This can benefit from faster UI and reduced API usage.
3. Lazy Loading Data
Load data only when required instead of all at once. Common techniques include pagination and infinite scrolling. This improves initial page load performance.
4. Minimize Re-renders
Frequent state updates can trigger unnecessary re-renders in frameworks like React. Then, use memoization (useMemo, React.memo) and structure state efficiently.
5. Optimize Request Frequency
Avoid duplicate API calls by combining requests when possible and using dependency arrays correctly in useEffect.
Efficient API handling is not just about speed. It’s about delivering a smooth, responsive user experience while reducing system load.
Best Practices for Clean and Scalable API Integration
As applications grow, poorly structured API calls can quickly become difficult to manage. Following best practices ensures your frontend remains maintainable, scalable, and easy to debug.
1. Separate API Logic from UI
Avoid placing API calls directly inside components. Instead, create dedicated API service files. Here is the explanation.

This improves code reusability and keeps components clean.
2. Use Environment Variables
Store API URLs and configurations outside your codebase. Check the following:

This makes your app flexible across development, staging, and production environments.
3. Centralize Error Handling
Instead of handling errors in every component, create a unified error handling strategy using interceptors or utility functions.
4. Create Reusable Hooks (React)
Use API logic in reusable hooks for better abstraction. Here is the example.

5. Validate and Sanitize Data
Never assume API responses are always correct. Validate data before rendering to prevent UI issues.
6. Keep Components Focused
Components should handle presentation, not business logic. This separation improves readability and scalability.
Clean API integration is about making requests. It’s about designing a system that is modular, reusable, and production-ready as your application scales.
Perfect Tools That Simplify API Integration
Efficient API integration is not just about writing code. It also depends on using the right tools for testing, debugging, and understanding APIs. These tools streamline development and reduce errors significantly.
1. API Testing Tools
QA & testing tools like Postman allow you to test API endpoints before integrating them into your front-end. You can:
-
Send different types of requests (GET, POST, etc.).
-
Inspect responses and status codes.
-
Validate headers and authentication.
This helps ensure the API works correctly before writing front-end logic.
2. API Documentation Tools
Well-documented APIs make integration faster. Tools like Swagger (OpenAPI) provide:
-
Clear endpoint structures.
-
Request and response formats.
-
Authentication details.
This reduces guesswork and implementation errors.
3. Browser Developer Tools
Built-in browser DevTools (Network tab) are essential for debugging:
-
Monitor API requests in real time.
-
Check headers, payload, and responses.
-
Identify failed requests and status codes.
4. Mock APIs and Testing Environments
Mock APIs help simulate back-end responses when the real API is not ready. This allows front-end development to continue without delays.
Using the right tools improves development speed, debugging efficiency, and overall code reliability, keeping API integration smoother and more predictable.
Conclusion
API integration is a foundational skill in modern front-end development. It goes beyond simply making HTTP requests. It involves managing the entire data lifecycle, from fetching and validating responses to handling errors and optimizing performance.
As applications become more data-driven, understanding API integration will remain essential for building fast, dynamic, and production-ready front-end systems.