BTC - Bitcoin
 USDTERC20 - USDT ERC20
 ETH - Ethereum
 BNB - Binance
 BCH - Bitcoin Cash
 DOGE - Dogecoin
 TRX - TRON
 USDTTRC20 - USD TRC20
 LTC - LiteCoin
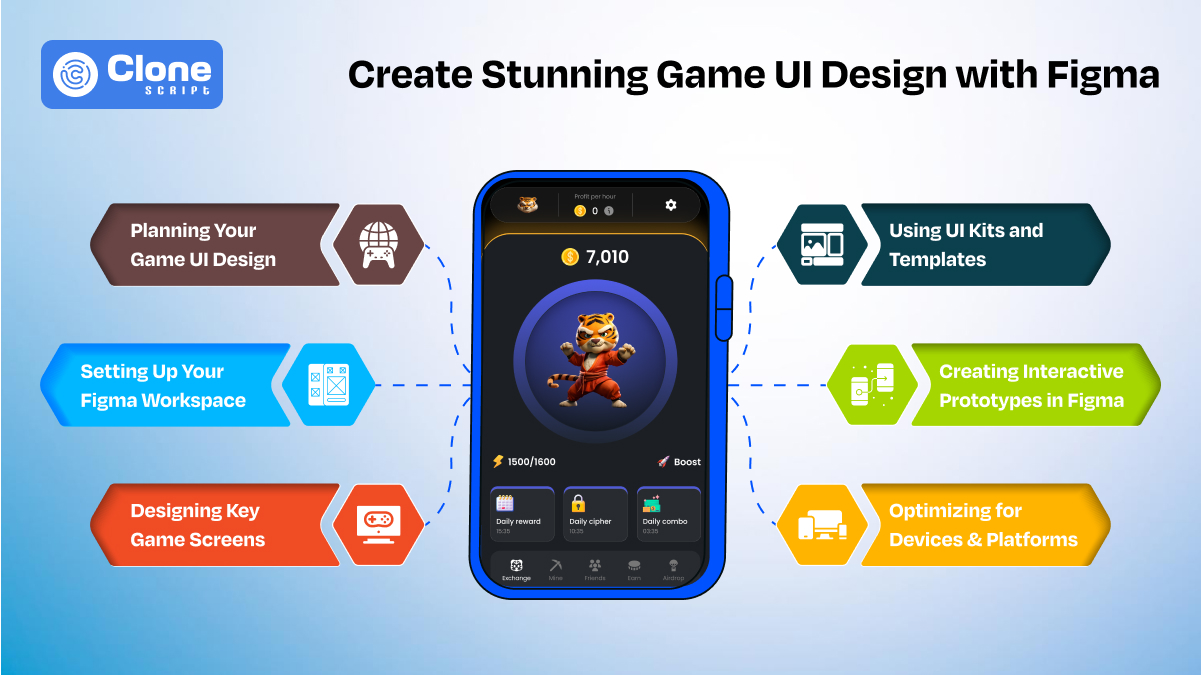
How to Create Stunning Game UI Design with Figma In 7 Steps
Game UI design plays a vital role in how players engage with your game. Whether you're building a sleek mobile puzzle or an intense multiplayer shooter, your interface must be intuitive, immersive, and easy to navigate. A good game UI balances aesthetics with functionality and leads players effortlessly from action to inventory without pulling them out of the experience.
Figma UI tools are revolutionizing how modern designers approach interface creation, especially in the game development world. With powerful features like real-time collaboration, component libraries, and advanced prototyping, Figma has become the preferred platform for creating high-quality app user interface designs that scale beautifully across devices.
In this guide, we’ll walk through every step of building a polished, engaging game UI using Figma. From there, your users get a seamless, delightful gaming experience from the first tap to the final level.
Step 1. Planning Your Game UI Design.
The first step is to focus on game app development planning. Once you have a clear plan to make the next most successful RPG game like World of Warcraft or a Web3 game like the Hamster Kombat app, it is important.
No design tool can replace a solid strategy. Before jumping into Figma design, outline your game’s core structure. Ask yourself:
-
Who is your target player?
-
What platforms are you launching on (mobile, console, web)?
-
What visual theme does your game follow: futuristic, fantasy, retro?
-
How do players interact with the game’s controls and UI?
Start by sketching a rough Figma layout for menus, controls, and player HUDs.
Align each interface with gameplay goals: health indicators should be clear and immediate; inventory screens should allow for fast access.
Whether you're building a site UI design for a browser game or a mobile app UI design for iOS/Android, clarity is key.
Early planning avoids confusion and sets a foundation for a well-structured user interface that players will enjoy engaging with.
The next step is to open Figma on the web and start working on it.
Step 2. Setting Up Your Figma Workspace.
Once your design direction is mapped out, it’s time to set up your Figma interface. A well-organized workspace increases productivity and keeps your design system consistent.
Here’s how to set it up efficiently:
-
Create separate frames for every screen (Main Menu, HUD, Pause Menu, Store, etc.)
-
Use Figma components for reusable elements like icons, buttons, and health bars. This reduces manual repetition.
-
Apply text styles, color variables, and auto-layouts to maintain alignment and hierarchy.
-
Use Figma templates or starter files to jump-start your setup, especially if you’re following modern UI/UX trends for mobile app development.
A structured workspace also helps developers extract design specs easily using Figma for website design or app interfaces. This is important in agile workflows, where speed and clarity matter.
The next step is to focus on design elements for gaming app development.
Step 3. Designing Key Game Screens.
Your game’s visual storytelling happens across its screens. These interfaces are more than static designs. They are part of the player’s journey.
Let’s explore the main screens and how to design them with intention:
-
Main Menu: Establish the game’s theme with bold visuals and intuitive navigation. Make the "Play" and "Settings" buttons immediately visible and tappable.
-
HUD (Heads-Up Display): Prioritize information like health, ammo, score, and map without cluttering the screen. Responsive layouts easily adapt to mobile UI design and tablets.
-
Inventory & Store Screens: Group categories logically (weapons, power-ups, skins) and apply clear visual cues for interaction.
-
Pause and Settings: Keep these minimal and distraction-free. Allow access to controls, sound, and exit options.
If you're designing for the web, think of these as web page UI design screens within your larger application. Use consistent spacing and a balanced visual hierarchy for a polished, professional result.
The UI kits and templates in app development will manage the entire development lifecycle efficiently. The upcoming step is defining it.
Step 4. Using UI Kits and Templates.
Starting from zero isn't always the most efficient route, especially under tight development schedules. That’s where Figma UI kit libraries and templates can save the day.
Here’s how to get the most out of pre-built assets:
-
Speed up ideation: Quickly mock up functional screens using Figma website templates designed for games, dashboards, or mobile app design.
-
Ensure consistency: UI kits come with cohesive colors, typography, and spacing standards. It keeps the user engaged and helps to stay competitive.
-
Learn from professionals: See how seasoned designers structure their files and apply principles like modularity and padding.
Some game-focused kits include dashboard UI elements, app UI buttons, or HUD packs, which can be a great starting point. Modify these assets to match your brand’s visual identity, and the final result aligns with your game’s aesthetics.
Purchasing a UI kit and app templates is half the work you complete. To make the gaming app design real, you have to prototype it. Here are the steps you have to follow.
Step 5. Creating Interactive Prototypes in Figma.
Static screens are great, but stakeholders and devs need to experience how the interface flows. This is where Figma prototype features truly shine.
There’s a difference between app prototyping and wireframing. Don’t be confused.
With prototyping in Figma, you can:
-
Create clickable flows between screens
-
Add hover states and on-click transitions
-
Simulate menu overlays and tutorial popups
-
Test animated feedback on button interactions
A polished prototype communicates intent far better than static visuals. It gives your developers a crystal-clear understanding of user paths and animations, saving time in implementation.
Use prototyping, especially when presenting to non-technical stakeholders. Whether it’s a Figma web design game portal or a dash UI for admin screens, interactivity adds clarity and polish.
The next step is to design the game according to the device sizes that are usually preferred. But don’t know how to do it? Let’s see.
Step 6. Optimizing for Devices & Platforms.
Modern games live across platforms. Your UI needs to look and feel perfect on every device it touches, from iPhones to browser windows to next-gen consoles.
Here’s how to optimize your design with Figma's responsive methods:
-
Use auto-layout and constraints to make designs adapt dynamically to screen size.
-
Design using pixel grids and preview in various device frames.
-
Ensure legibility on both small (mobile) and large (console or desktop) screens.
-
Simulate touch vs. click behavior where necessary.
Responsive testing is essential in mobile app UI design, where tap targets, font size, and scroll behavior greatly affect usability.
Don't forget about Figma web design compatibility for game-related websites. You might want to design both the in-game interface and supporting assets like a Figma website for the community or support.
The next step is to check the mobile game app design you have created.
Step 7. Testing and Improving Your UI.
Even the most beautiful UI can fall flat if users don’t know how to navigate it. Testing helps you refine and evolve your design with real feedback.
Here’s how to test smartly:
-
Use Figma prototypes with playtesters to observe real interactions
-
Measure where users hesitate or misclick
-
Ask players to complete specific tasks and analyze friction points
-
Revisit and revise based on testing insights
Also, collect feedback from developers using Figma web design collaboration features. This allows everyone to stay aligned, even when iterating quickly.
If your game includes a dashboard UI (like player stats or settings), be sure to test for data readability, flow, and hierarchy as well. Follow the best dashboard UI/UX design principles to deliver the proper output.
Improvements don’t stop after the launch. Monitor analytics, heatmaps, and user feedback to continuously evolve your ui design in games, especially as your game updates and grows.
Conclusion
Designing stunning, intuitive UI design for games is both an art and a science. With Figma 2025 tools and workflows, you have everything needed to build immersive, scalable, and highly functional interfaces. Whether you're building a mobile puzzle app, a multiplayer battle royale, or an RPG with complex inventory systems.
By planning, leveraging Figma templates, using modern UI principles, and continually testing, you can make sure your UI web design supports gameplay, not hinders it.
A great game UI doesn’t just decorate the game. It enhances players’ expectations. When crafted thoughtfully in Figma, it becomes the bridge between user and experience, action and story, fun and function.
Now it’s your turn. Open up your Figma website design file, define your screens, and let your creativity flow.
Want the best user interface designs for making your web development task qualitative and smooth?